
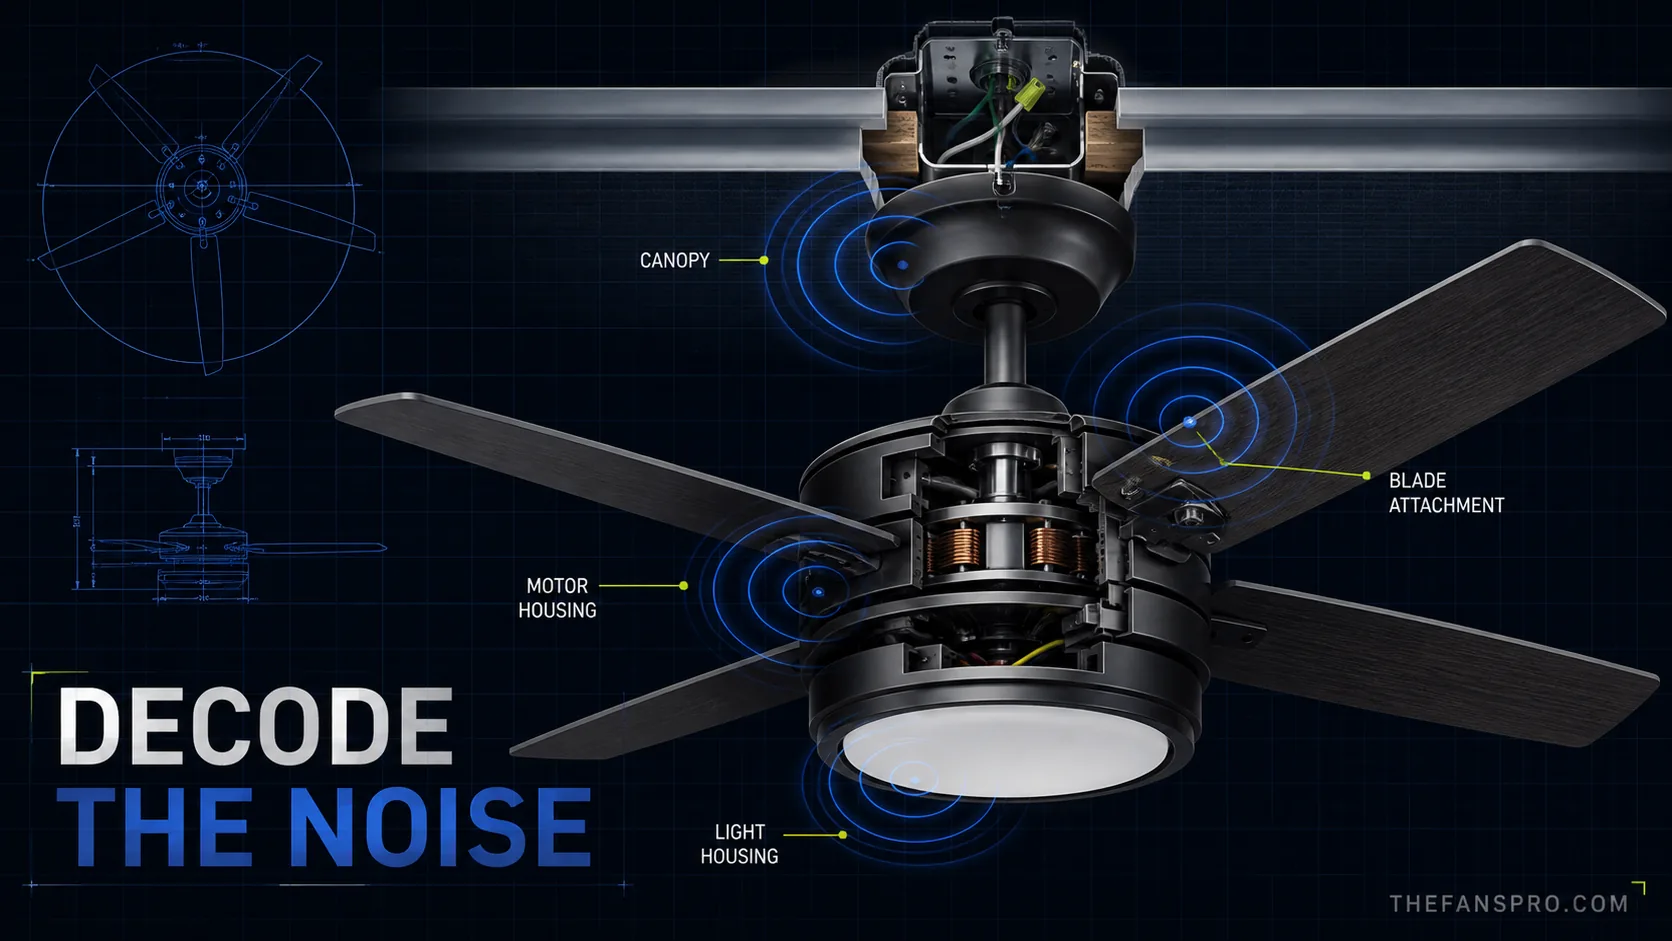
A ceiling-fan noise is more useful when you describe its rhythm and location. A click once per revolution points you toward a rotating part. A steady electrical hum follows a different path. A rattle that stops when the light is off may come from the globe or light housing, not the motor.
This guide uses manufacturer troubleshooting instructions to narrow the cause without pretending every noise can be diagnosed remotely. Start with the safe, external checks. Stop and use a qualified electrician when the sound involves wiring, a breaker, heat, odor, crackling, or a mounting system you cannot verify.
As an Amazon Associate, TheFansPro earns from qualifying purchases.
Ceiling-fan noise map
| Sound pattern | First places to check | Escalate when |
|---|---|---|
| Click or tick once per revolution | Blade screws, blade holders, pull chain, wire or decorative part touching a rotating surface | A blade is cracked, bent, loose at the motor, or the click is inside the motor |
| Random rattle | Light globe, shade, finial, canopy trim, loose fastener, receiver resting against housing | The ceiling box or support moves |
| Steady hum or buzz | Control compatibility, receiver, light/LED driver, loose fitting, manufacturer support | The sound traces to house wiring, wall control, breaker, heat, or odor |
| Scrape or rub | Blade holder orientation, canopy contact, wire/contact point, warped component | A rotating part touches wiring or the motor housing |
| Grinding or squealing | Stop the fan; check the manual and warranty before attempting service | The sound comes from the motor/bearing area or the blades do not spin freely with power off |
| Noise only at one speed | Control/receiver compatibility, resonance in a loose part, mounting hardware | It is electrical, worsening, hot, or accompanied by odor |
The safe troubleshooting order
Record the pattern before touching anything
Note whether the sound follows each revolution, changes with speed, appears only with the light on, or begins after the fan has run for several minutes. Record a short video from a safe position. Write down the model number before contacting the manufacturer.
Turn the fan off and let it stop completely
Use the wall control to stop the fan, then switch off the circuit at the service panel before touching hardware or opening any cover. Follow the exact manual. If the disconnect cannot be locked, manufacturer instructions commonly call for a clear warning tag so power is not restored accidentally.
Clean and inspect the blades
Uneven dust can add imbalance and vibration. Clean all blades using the method allowed by the manual, then look for a cracked, warped, or loose blade. Do not mix blades from another fan or set; manufacturers may weight-match blades as a group.
Check accessible blade and light hardware
Hunter identifies loose blade or blade-holder screws as a common source of clicking. A loose globe, shade, finial, or light-kit fastener can rattle as the fan vibrates. Tighten to the manufacturer’s instruction—firm is not the same as overtightened glass or stripped hardware.
Inspect the canopy and visible mounting behavior
With power off, look for a loose trim ring or canopy contact. When the fan was running, did the canopy or ceiling box visibly shift? A decorative cover can rattle; a moving support is a structural safety problem. Do not keep testing a fan whose box or support is moving.
Separate fan noise from light noise
After reassembly and from a safe operating position, compare fan-only and light-only operation if the control system allows it. Buzzing that appears only with the light can point toward bulb wattage, a lamp, dimmer compatibility, LED driver, or light-control issue. Use only the light type, wattage, and control arrangement approved for the exact model.
Stop before electrical diagnosis becomes guesswork
Hunter’s support guidance says a defective receiver can hum and tells owners to contact support. It also directs wiring or breaker buzz to an electrician. That is the correct dividing line: external tightening and cleaning are homeowner checks; live wiring, breaker, receiver, and motor diagnosis require the manual, manufacturer, or a qualified professional.
What each sound usually means
Clicking or ticking
A repetitive click often follows rotation. Start with blade screws and blade holders, then look for a pull chain, wire, tag, or decorative part touching something that rotates. Hunter specifically names loose blade and blade-holder screws. Modern Fan also lists obstructions in the rotor path, ceiling mounting hardware, and blade attachments.
If the click remains after external hardware is secure, do not keep disassembling the motor. Check warranty support with the model number and recording.
Rattling
Rattling is frequently a loose nonmotor part: glass, shade, finial, canopy trim, screw, or control receiver. Test whether the rattle changes when the light is on and whether gentle hand pressure—only while the fan is off—reveals a loose cover. Replace cracked glass or damaged fittings instead of forcing them tighter.
Humming or buzzing
A low motor sound may be normal for some designs, but a new, loud, or changing hum deserves investigation. Manufacturer sources point to several different causes:
- a receiver or control component;
- a light dimmer or incompatible speed control;
- a loose fitting resonating at one speed;
- incorrect bulb wattage or a lighting component;
- house wiring or a circuit breaker.
Do not install a generic wall dimmer to control fan speed. Use the control type specified for the exact fan. If buzzing traces to wiring, the wall control, or the breaker, turn off the circuit and call an electrician.
Rubbing or scraping
Rubbing indicates physical contact. Hunter notes that incorrectly oriented blade holders can touch the motor housing on some models. A canopy, trim piece, wire, or warped component can also make contact. Stop the fan before the contact damages insulation, finish, or rotating parts.
Grinding or squealing
These sounds are not a cue to pour oil into a random opening. Many modern fans use sealed, maintenance-free bearings; Modern Fan explicitly says its bearings do not need lubrication. Some older or specialized fans do have a manufacturer-defined oil port and procedure. The manual decides. If the motor or bearing area grinds, stop the fan and use manufacturer or professional service.
Noise only at one speed
One-speed noise can be resonance: a loose part vibrates at a particular frequency. It can also involve a receiver or speed control. Check accessible fittings and control compatibility, but do not infer the failed electrical component from sound alone.
Should you balance the fan?
Balance a fan when wobble accompanies the noise and the support, hanger, fasteners, and blades are otherwise sound. Before adding weights:
- confirm the mounting bracket and fan-rated box are secure;
- tighten the downrod set screw or pin exactly as the manual shows;
- inspect for a warped, cracked, or damaged blade;
- keep the original blade set together;
- use the balancing kit instructions for the model.
Search Amazon for a ceiling-fan balancing kit
A balancing kit cannot make a loose outlet box safe and cannot repair a damaged blade.
When repair stops making sense
Replacement may be the better decision when the motor or proprietary electronics have failed outside warranty, exact replacement parts are unavailable, blades are damaged and no matched set exists, or the fan is installed on the wrong box or in the wrong location rating. Compare the total cost of parts and labor with a current fan whose controls and replacement parts are still supported.
For control and receiver problems, start with our replacement parts and remotes guide when the fan is Harbor Breeze. For a replacement in a bedroom, compare the quiet ceiling fan guide. If poor airflow is the real complaint, use the fan speed and airflow troubleshooting guide without bypassing the fan’s approved controls.
What to give manufacturer support
- brand, exact model/item number, and date code if present;
- proof of purchase and installation date;
- when the noise began and whether anything changed;
- which speeds produce it;
- whether the light changes it;
- a short video or audio recording;
- the safe external checks already completed.
That information is far more useful than “the fan is loud” and helps preserve a warranty path.
Bottom line
Start with rhythm, location, and one-variable tests. Clicking usually sends you toward rotating attachments; rattling toward loose fittings; humming toward controls, receivers, lights, or electrical service; scraping toward physical contact. Tighten and clean only with power safely disconnected and the manual in hand. Crackling, odor, heat, wiring buzz, a moving support, or internal grinding is the point to stop and escalate.
